
Plan Drawings: Getting Started
Overview
Adding Plan Drawings is easy, simply:
- Upload a Plan Drawing
- Link the Plan Drawing to a Collection
- Open the Plan Viewer
- Place 360s on the Plan Drawing
Uploading Plan Drawings
You'll need to upload a Plan Drawing to use it. You can do that in one of two places:

- The "Add/Link Plan" button from any Collection Details Page
- The Manage Plan link on your Account Page
This will open the Plan Drawing modal, click the "Add New Plan" button:

This will launch the file upload wizard.
Uploading Your File

1. (For PDFs only) Select the desired Resolution from the dropdown
2. Click the plus to upload the file from your device.
After the file uploads, you will see a Processing spinner as it is processed; after it completes, you will see a thumbnail and the number of pages. Do not navigate away from the page while the spinner is spinning, otherwise you will need to start over.

If you need to start over you can just click the "x" on the thumbnail and it will take you back to the upload file screen. If it looks right, click the "Next" button.
Accepted File Formats
Both PDFs and image files (PNG, JPG) are accepted.
Multipage PDFs are processed as a single Plan Drawing, while image files are considered separate Plan Drawings.
For PDFs, the default import resolution is 72 dpi; change the dropdown to rasterize the PDF at higher resolutions if necessary (available for paid accounts only). Note that selecting too high a resolution can result in slower page load times if the file size is too.
Edit Pages and Set Page Names
You'll next review and change individual Page names.

Open a larger Preview of the page by clicking on the thumbnail (1). The image will appear in a new tab.
Select the Page with the Page selector (2); names will default to "Page 1", "Page 2", etc. If you want to change the page names you can do that in the Page name field (3). These names will display on the page dropdown in the Plan Viewer later to identify each page.
If you want to delete a page (available for a multi-page Plan Drawings), click the trash can icon (4) and then confirm. That page will be removed from your Plan Drawing.
If it looks good, click "Next" (5).
Set Plan Name
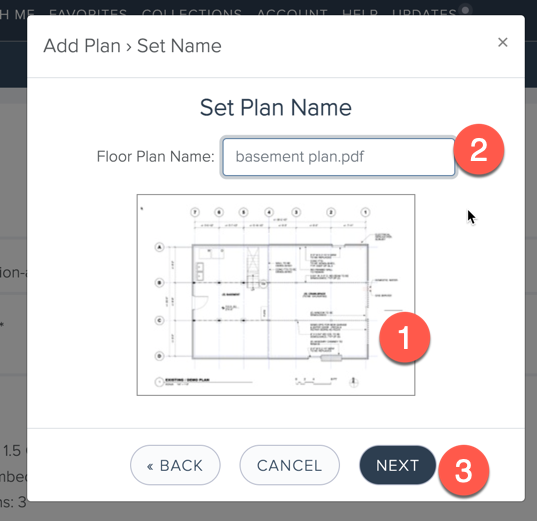
Click on the thumbnail (1) to view the first page of the processed Plan Drawing image in a new tab.
By default the file name is used as the Plan name; you can change it and rename it using the Plan name field (2). This will be the title of the Plan displayed wherever it is referenced.
After you're done click "Next" (3).
Linking a Plan Drawing to a Collection
The most common way to use Plan Drawings is as part of a Collection. To do that, link a Plan Drawing to a Collection:
From the Collection Details Page, click the "Add/Link Plan" button:

The Link Plan Drawing window will display. The left side shows all the Plan Drawings that have been uploaded (if you need to upload a new Plan Drawing, click the "Add New Plan" button — see "Uploading Plan Drawings"). You should see all your previously uploaded Plan Drawings here.

1. Find the Plan you want in the list and select it
2. (optional) Click the thumbnail to view a larger version of the image
3. (optional) Choose whether to add any previously placed images to the current Collection
4. Click "Link Plan"
You will see a confirmation that the plan is now linked. After clicking "OK," you will see the linked Plan under the button bar on the Collection Details Page:

Linking Multiple Plan Drawings to a Collection
You can link multiple Plan Drawings to a single Collection. In this case the Plan Drawing names will display sequentially across the top.

The Plan Viewer
Now that the Plan Drawing is linked to your Collection, add markers to link to any 360s currently in the Collection:
Open the Plan Viewer by clicking on the name of the Plan from the Collection Details Page.

The Plan Viewer works like most mapping apps:
1. Plan Sheet Selector: For multi-page Plans, use the page selector dropdown to pick which Plan Sheet is displayed. The names (set during the Plan Upload process) will appear in the dropdown. If there is only a single page this will not display.
2. Draggable canvas: Drag on the Plan to move around.
3. Zoom controls: You can zoom in/out using the button controls, mousewheel, double-tapping/double-clicking, or pinch-zoom gestures on touch interfaces.
4. Close: Closes the Plan Viewer
Placing 360s on a Plan

Place a marker by either:
a. Clicking the "Place 360" button (this will create a marker in the center of the map)
b. Right-clicking on the map (the marker will be created wherever you click)
This will open the Place Marker dialog:

1. Select 360 (required): Click to open the target 360 selector — this is what you want the marker to link to
2. Set marker shape (optional): The default shape is a pushpin, you can change it to other options, including any Custom Annotation Markers
3. Set marker position: Drag the marker to adjust its position. Use pan/zoom to fine-tune the position on the Plan.
4. Save to save the marker position on the Plan.
Cancel will close the panel and remove the marker
Once you have selected the 360, adjusted the marker position and shape, clicking Save will save the marker on the Plan and the panel will display the Marker Details.

You can continue placing markers either by right-clicking or using the "Place 360" button. Note that you can place markers for the same 360 into multiple places on the same Plan if you wish.
Editing Markers
You can always change a marker by editing it.

1. Select the Marker by clicking on it
2. Click the Edit icon
This will put you into Edit mode.

You will then be able to change:
A. Marker position (drag to the new position)
B. Target 360 (select a new one)
C. Marker shape (select a new one)
When done, click the "Save" button (D). To discard changes, click "Cancel."
Note: You cannot move a Marker to a different page in the Plan Drawing. Instead, you will have to delete the Marker placement, switch to the desired page, and place a new Marker there.
Deleting Marker Placements
To remove a Marker, select it and then click the "Delete" (trash can) icon. You will get a confirmation.
Removing a Marker Placement from a linked Plan does NOT remove the target 360 from the Collection (to remove a 360 from a Collection see here).